Layer Manager
The Layer Manager is accessible from the Manager Menu at the top right of the app.
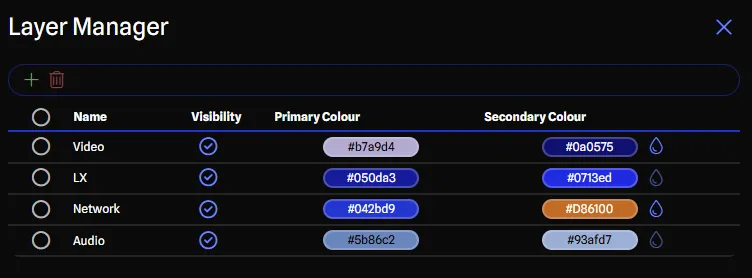
This manager allows you to customize the layers in your project. Layers are a way to organize your project into different sections. You can create, delete, and rename layers. Layers have the following properties:
- Name: The name of the layer.
- Visibility: Whether the layer is visible or not. When a layer is not visible, all the objects on that layer are hidden in the drawing.
- Primary Colour: The primary colour of the layer. This is used differently depending on the item
the colour is applied to. For example, if a gear item is set to use the layer colour, it will use this
colour as the background.
- It also determines label colours on most items. For example, a bright colour will set the labels to black so they are readable, and a dark colour will set the labels to white.
- Secondary Colour: The secondary colour of the layer. This is usually used to set the border colour
of the gear item, or the border colour of a connection label.
- Base on Primary Colour: The droplet icon next to the secondary colour selection will choose a colour that is based on the primary colour. This sets the secondary colour to be 15% lighter than the primary colour’s current colour. This is the default behaviour when creating a new layer.
Colour Picker
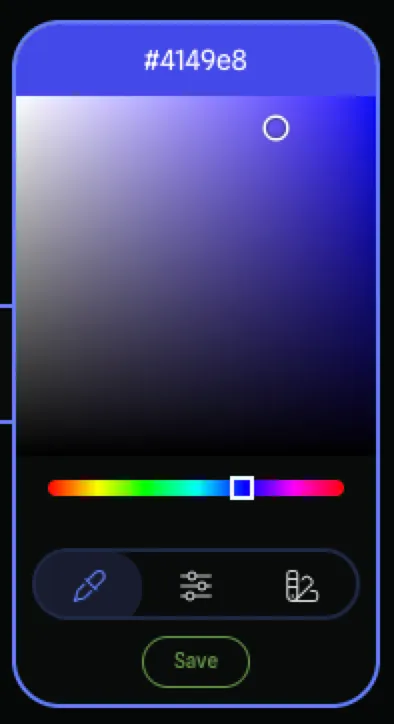
The colour picker provides several ways to choose a colour:
Spectrum
The Spectrum view shows a colour gradient that you can click or drag to select any colour. Use this when you need a specific colour that isn’t in the palette.
Tune
The Tune view provides sliders for fine-tuning individual colour channels (red, green, blue). Use this for precise colour adjustments.
Palette
The Palette view shows a curated set of common colours, including the app’s brand colours and other useful defaults. Click a palette colour to select it.
Hex Input
You can also type a hex colour code directly into the text input above the picker.
Saving Your Selection
After selecting a colour, click the Save button to apply it. You can also double-click on the colour picker area (spectrum, sliders, or palette) to save and close the picker in one action.
Adding Layers
To add a layer, click on the Plus button in the toolbar. This will add a new layer to the list with a default name and colours. You can then rename the layer and change the colours as needed.
Deleting Layers
To delete a layer or layers, select the layers you wish to delete by clicking on their checkboxes. You can also hold Shift and click to select a range of rows. Then click on the Trash button in the toolbar. This will delete the selected layers.
Copy and Pasting Layers
You can copy and paste layers within the Layer Manager. This is useful for quickly creating similar layers without having to re-enter all the details. To copy a layer:
- Select the layer or layers you want to copy by clicking on their checkboxes.
- Click the Copy button in the toolbar.
- Click the Paste button in the toolbar to create a duplicate of the layer.
Bulk Editing
You can edit multiple rows at once by selecting them using the checkboxes. Hold Shift and click to select a range of rows. When multiple rows are selected, editing a field on one selected row applies the change to all selected rows.
Requires Local Mode. Some fields may skip certain rows if the change is not applicable.
Supported fields for bulk editing: Name, Visibility, Primary Colour, Secondary Colour, Base on Primary Colour.
Items That Support Layers
The following items support having a layer assigned to them:
- Gear: The gear item can be assigned a layer. The gear will use the layer colours for the background and text.
- Ports: The port on a gear will be assigned the layer of the gear it belongs to.
- Connections: The connection between two gear items can be assigned a layer. The connection will use the layer colours for the line and text if set to use the layer colours (by default, connections use the port colours).
Assigning Layers to Items
There are several ways to assign a layer to an item. Some of them include:
- When inserting gear, the active layer in the Draw Toolbar will be used as the layer for the gear.
- Selecting a gear item or connection and changing the layer in the Draw Toolbar will change the layer for that item.
- When multiple items are selected, the layer dropdown shows “Mixed” if items are on different layers. Selecting a layer will change all eligible items (gear and connections) to that layer. This requires Local Mode.
- Right clicking a gear item or connection and choosing Change Layer will allow you to change the layer for the item.
- Selecting a new layer in the Layer column in the Report Page for a Gear or Connection report.