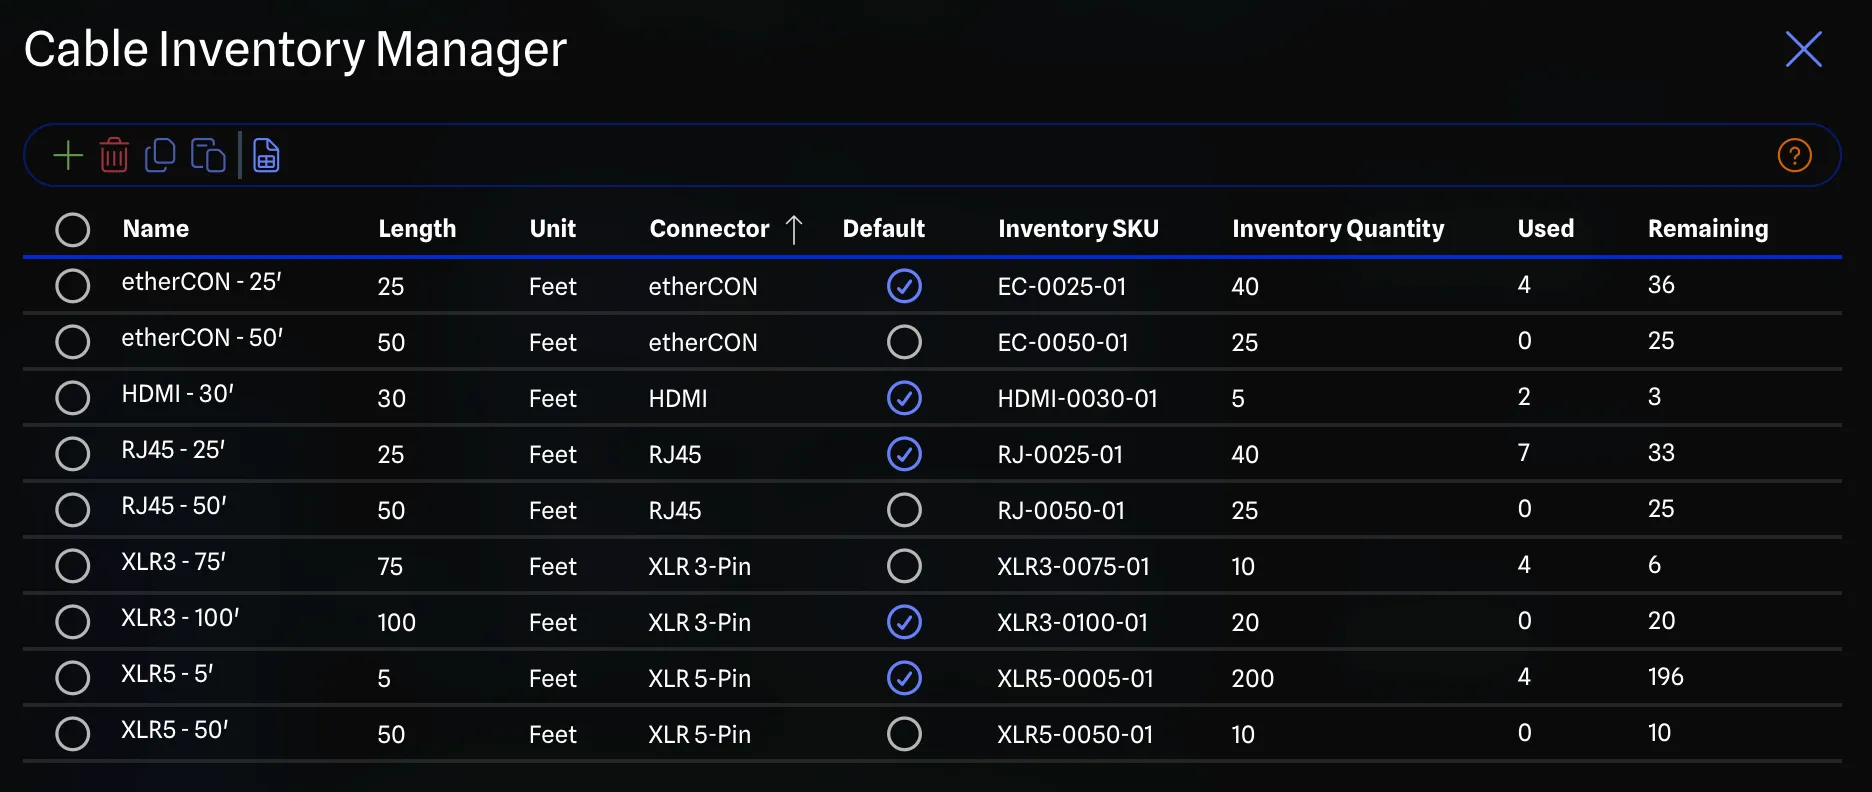
Cable Inventory Manager
The Cable Inventory (Pro feature) feature allows you to create and manage a standardized list of cable types for your projects. By defining cables with lengths, units, connectors, and inventory SKUs, you can organize your connections and generate accurate cable reports.
Adding Cables
Section titled “Adding Cables”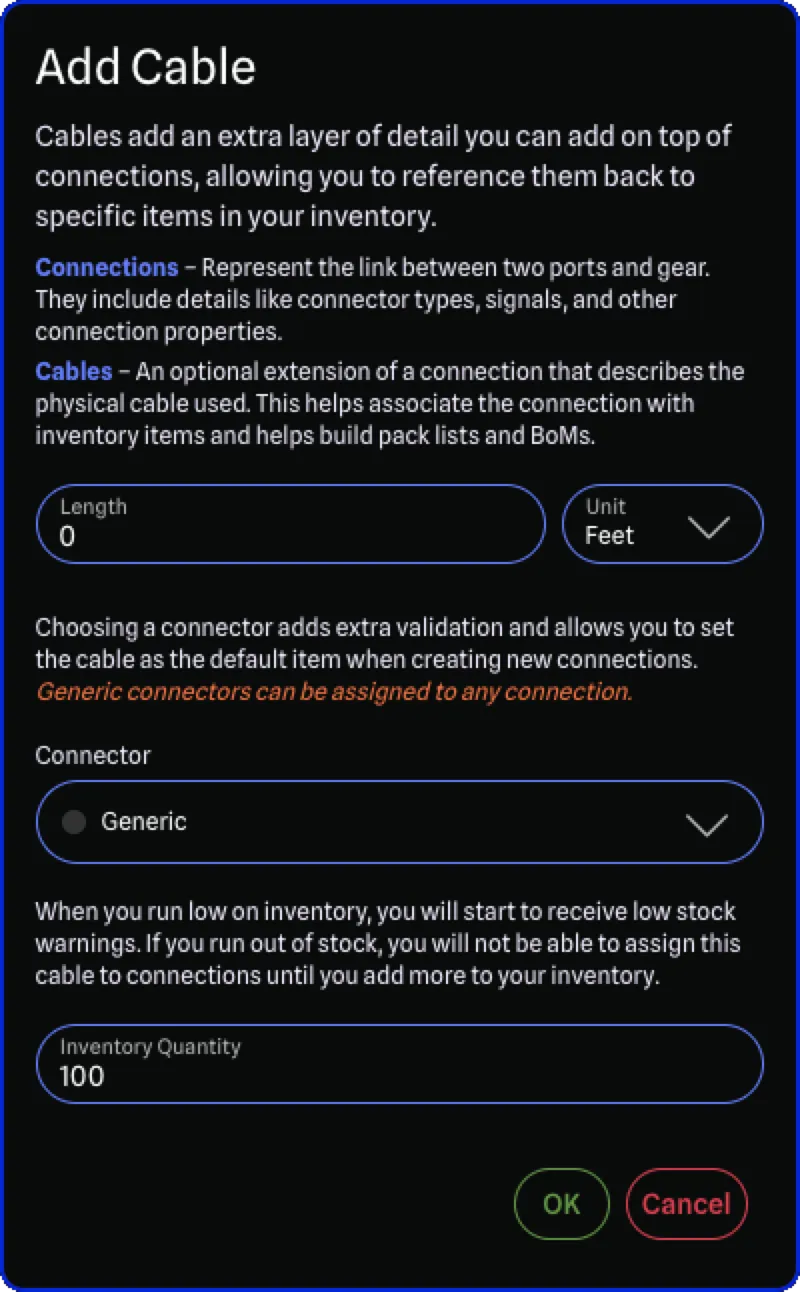
To add a cable, click on the Plus button in the toolbar. This will open the Add Cable Dialog. In this dialog, you can specify the following properties for the new cable:
- Length: Enter the length of the cable in either feet or meters. The length must be a positive number up to 5 digits with up to 2 decimal places (e.g., “5”, “7.5”, “10”).
- Unit: Choose the unit of measurement for the cable length (either feet or meters).
- Connector: Select the connector type for the cable (e.g., RJ45, XLR 3-Pin, LC Duplex SMF, etc.). Connectors are organized by category for easy browsing. See Using the Categorized Selector for details on navigating this menu.
- Inventory Quantity: Specify the number of cables in your inventory. This will be used to track how many cables of this type you have left in stock once you start assigning them to connections.
New cables are automatically named based on their connection, length, and unit (e.g., “RJ45 - 10m” for a 10-meter RJ45 cable).
To learn more about the different options, please refer to the Cable Inventory page.
Table Sorting
Section titled “Table Sorting”The table will sort cables in a logical order to make it easier to find the cables you need. The default sorting is:
- Connector (alphabetical order)
- Unit (feet before meters)
- Length (from shortest to longest)
If you choose to sort by a column, your selection will apply first, before sorting by the above.
Editing Cable Properties
Section titled “Editing Cable Properties”You can edit cable properties directly in the table by clicking on any field. Cables have the following properties:
- Name: The display name for the cable; by default, this is automatically generated based on the cable’s connector type, length, and unit (e.g., “RJ45 - 10m”). You can change this name to something more descriptive if needed.
- Length: The cable length (positive numbers up to 5 digits with up to 2 decimal places, e.g., “5”, “7.5”, “10”).
- Unit: Choose between meters or feet from the dropdown.
- Connector: The connector type for the cable (e.g., RJ45, XLR 3-Pin, LC Duplex SMF, etc.). Connectors are organized by category for easy selection. See Using the Categorized Selector for details on navigating the connector menu.
- Default: Specify whether this cable will be used automatically as the assigned cable for new connections.
- Note: Only one cable can be set as the default cable at a time per connector. If you set a new cable as default, the previous default cable of that connector will no longer be marked as default.
- Inventory SKU: Optional part number or stock keeping unit to easily identify the cable in your inventory.
Removing Cables
Section titled “Removing Cables”To delete a cable or cables, select the cables you wish to delete by clicking on their checkboxes. You can also hold Shift and click to select a range of rows. Then click on the Trash button in the toolbar. This will delete the selected cables.
Copy and Pasting Cables
Section titled “Copy and Pasting Cables”You can copy and paste cables within the Cable Inventory Manager. This is useful for quickly creating similar cables without having to re-enter all the details. To copy a cable:
- Select the cable or cables you want to copy by clicking on their checkboxes.
- Click the Copy button in the toolbar.
- Click the Paste button in the toolbar to create a duplicate of the cable.
Bulk Editing
Section titled “Bulk Editing”You can edit multiple rows at once by selecting them using the checkboxes. Hold Shift and click to select a range of rows. When multiple rows are selected, editing a field on one selected row applies the change to all selected rows.
Requires Local Mode. Some fields may skip certain rows if the change is not applicable.
Supported fields for bulk editing: Name, Length, Unit, Connector, Inventory Quantity.
Generating the Cable Count Report
Section titled “Generating the Cable Count Report”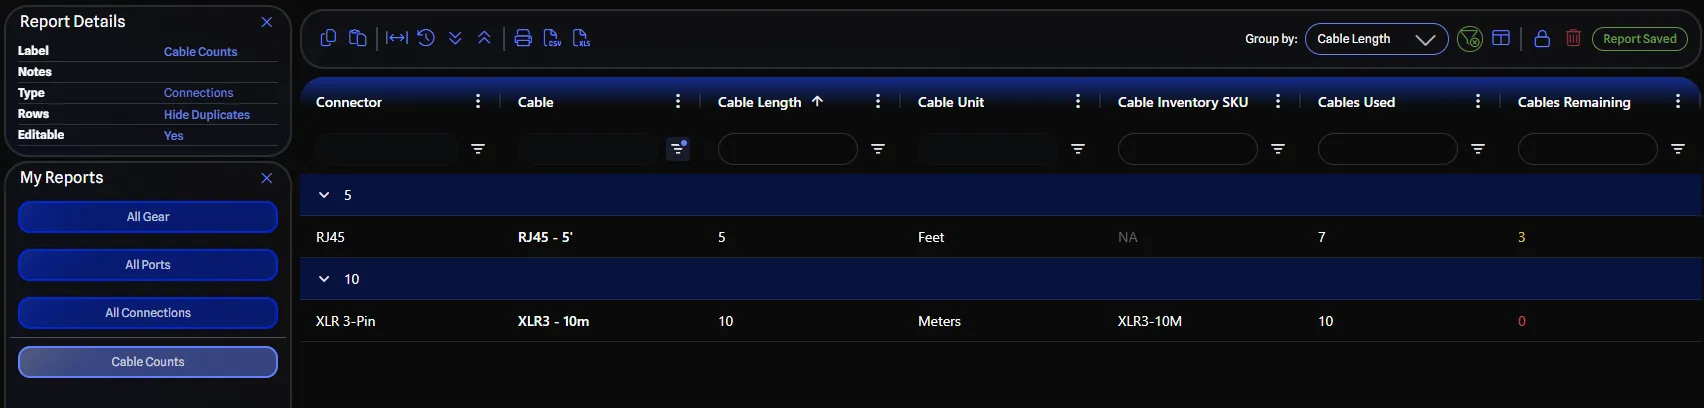
Clicking on the Cable Count Report button in the toolbar generates a connection report that shows the total number of cables in your inventory, grouped by cable length.
It shows similar information as the Cable Inventory Manager but with the full power of GearConnect’s reporting capabilities, allowing you to filter, sort, and export the report as needed.
This report will be generated with the following settings:
- Report Type: Connection
- Visible Columns:
- Connection
- Cable Name
- Cable Length
- Cable Unit
- Cable Inventory SKU
- Cables Used
- Cables Remaining
- Filter: All cables in the inventory
- Group By: Cable Length
- Sort By: Cable Length
- Unique Rows Only: Yes
Viewing Stock Levels
Section titled “Viewing Stock Levels”You can view the stock levels of your cables in the Cable Inventory Manager. The Inventory Quantity column shows how many cables of each type you have in stock. This number can be edited by you and defaults to 100 when you add a new cable.
When you assign a cable to a connection, the Used column will automatically update to reflect the number of connections using that cable. Similarly, the Remaining column will show the difference between the Inventory Quantity and Used.
The Used column will turn yellow when you have used more than half of your inventory for that cable, and it will turn red when you have used all of your inventory. This helps you keep track of your stock levels and know when to restock.