VLAN Manager
The VLAN Manager is accessible from the Manager Menu at the top right of the app.
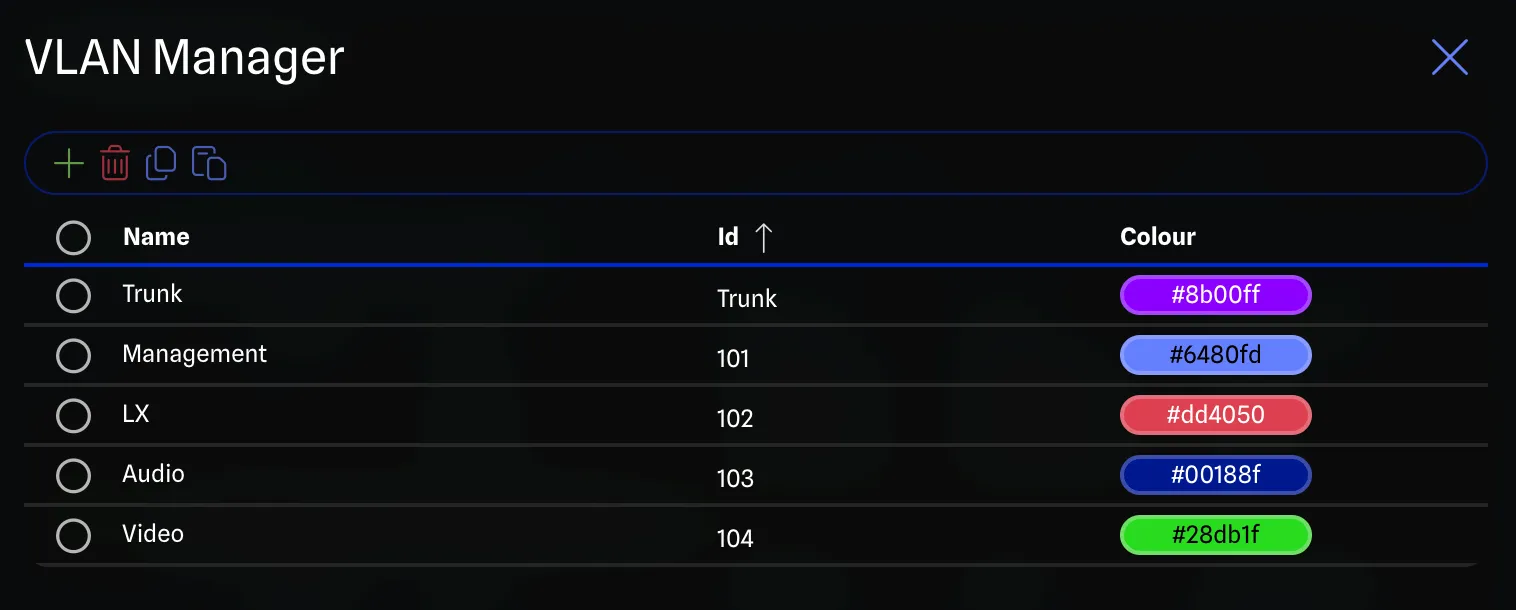
This manager allows you to customize the VLANs in your project. VLANs are used on Switches to separate traffic into different networks. Using VLANs also allows the app to validate IP addresses of your ports in real-time. You can create, delete, and rename VLANs. VLANs have the following properties:
- Name: The name of the VLAN. When changing between trunk and regular VLANs, the name will be updated for you.
- ID: The ID of the VLAN. This is a number between 1 and 4094. GearConnect defaults to using VLAN 101
and sequentially increments the VLAN ID for each new VLAN you create. You can change the VLAN ID as needed.
- When in Local Mode, if you try to change the VLAN ID to one that already exists, the app will automatically pick the next available ID.
- For trunk VLANs, no specific ID is assigned, as trunk ports carry traffic for multiple VLANs. In this case, the table will show “Trunk” instead of a VLAN ID.
- Colour: The colour of the VLAN.
Trunk VLANs
Trunk VLANs are special VLANs that carry traffic for multiple VLANs across a single physical connection.
You can enable the trunk option for a VLAN by selecting the Trunk checkbox when you are editing the ID field in the VLAN Manager. Likewise, you can disable the trunk option by unchecking the Trunk checkbox.
When you enable the trunk option for a VLAN:
- The VLAN ID is automatically cleared, as trunk ports do not have a specific VLAN ID.
- The name defaults to “Trunk”.
- Only one trunk VLAN can exist in a project at a time.
Adding VLANs
To add a VLAN, click on the Plus button in the toolbar. This will add a new VLAN to the list with a default name, ID, and colour. You can then rename the VLAN, change the ID, and change the colour as needed.
Deleting VLANs
To delete a VLAN or VLANs, select the VLANs you wish to delete by clicking on their checkboxes. You can also hold Shift and click to select a range of rows. Then click on the Trash button in the toolbar. This will delete the selected VLANs.
Copy and Pasting VLANs
You can copy and paste VLANs within the VLAN Manager. This is useful for quickly creating similar VLANs without having to re-enter all the details. To copy a VLAN:
- Select the VLAN or VLANs you want to copy by clicking on their checkboxes.
- Click the Copy button in the toolbar.
- Click the Paste button in the toolbar to create a duplicate of the VLAN.
Bulk Editing BETA APP
You can edit multiple rows at once by selecting them using the checkboxes. Hold Shift and click to select a range of rows. When multiple rows are selected, editing a field on one selected row applies the change to all selected rows.
Requires Local Mode. Some fields may skip certain rows if the change is not applicable.
Supported fields for bulk editing: Name, VLAN ID, Colour. When bulk editing VLAN IDs, rows are automatically renumbered to maintain unique IDs.
Assigning VLANs to Switch Ports
To assign a VLAN to a switch port, this is handled within the View All Details Dialog for a switch item:
- Click on the switch item in the drawing to select it.
- Click on the View all details button in the Gear Config pane.
- Find the port you would like to change the VLAN for and click on the VLAN dropdown to choose a new VLAN.