Text Boxes
Text boxes are used to add text to the drawing. They offer a handful of formatting options in addition to the ability to add text to the drawing.

Create a Text Box
To create a text box, click on the Insert Text Box button in the Draw Toolbar. This will change the cursor to a typing cursor. Click on the drawing area where you would like to place the text box and you will be able to start typing.
Text Box Toolbar
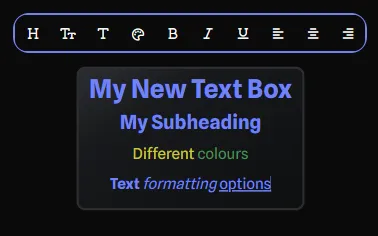
When you have a text box selected, you will see a floating toolbar above the text box. This toolbar contains the following options:
- Heading: Change the selected text to a heading. Keyboard shortcut is Ctrl + 1.
- Subheading: Change the selected text to a subheading. Keyboard shortcut is Ctrl + 2.
- Normal: Change the selected text to normal text. Keyboard shortcut is Ctrl + 3.
- Colour Picker: Change the colour of the selected text.
- Bold: Make the selected text bold. Keyboard shortcut is Ctrl + B.
- Italic: Make the selected text italic. Keyboard shortcut is Ctrl + I.
- Underline: Underline the selected text. Keyboard shortcut is Ctrl + U.
- Align Left: Align the text to the left.
- Align Centre: Align the text to the centre (the default).
- Align Right: Align the text to the right.
Auto Size
The text box will auto-size to fit the text you have entered. You can resize the text box by right-clicking on the text box and selecting Resize. You can then resize the text box manually via the handles that appear.
If you edit the text in the text box after resizing it, the text box will auto-size to fit the new text.
Text Box Colour
The default text box colour is a black with white text. You can change this by right-clicking on the text box and selecting Edit Colours. Like with regular gear items, the Primary Colour is the background and the Secondary Colour is the border.
By default, text colours adjust to black or white for optimal contrast. You can manually set a specific text colour by selecting the text and using the colour picker in the toolbar. This ensures the chosen colour remains consistent regardless of the background.
Text Box Opacity
You can hide the text box completely and just leave the text by right-clicking on the text box and selecting Edit Background Opacity. This will bring up a dialog where you can enter a number between 0 and 1, with the default being 0.85 (85% opacity). To hide the background completely, enter 0.
Locking and Unlocking Text Boxes
By right-clicking on the text box and selecting Lock, you can toggle the lock state of the text box. When locked, the text box cannot be modified, including being moved around on the drawing, until the text box is unlocked from the right-click menu again.
Sending to the Front or Back
By right-clicking on the text box and selecting Send to Back or Bring to Front, you can change the layering of the text box. This is useful when you have multiple text boxes overlapping and you want to change which one is on top. Sending to back will go behind gear but not Gear Groups. Gear Groups will always have lowest priority.
Removing Text Boxes
By right-clicking on the text box and selecting Remove, you can remove the text box from the drawing.
Multi-Selection
Text boxes can be included in multi-selection along with other items. Hold Shift and click on text boxes to add them to your selection. When selected with other items, you can use the Selection Toolbar to perform bulk actions.

