Undo Stack
The Undo Stack provides undo and redo functionality by capturing complete snapshots of your entire project state. Instead of only tracking specific changes, the Undo Stack preserves the entire project as snapshots, including the drawing layout, gear configurations, port settings, connections, layers, reports, project settings, and everything else.
Every action you take creates a snapshot, saved efficiently using delta updates (small updates that only include the changed information) to improve save and restore times. This ensures everything is undo-able and redo-able, allowing you to navigate through your project history while keeping the drawing and reports in sync.
The system automatically groups related changes made within the same time window into a single logical step, making navigation through your project’s evolution both intuitive and efficient.
How It Works
- Full-project snapshots: Each entry captures the whole project. Undoing can roll back a set of related changes made within the same time window, not just a single edit.
- Grouped changes: Edits made within about one second are grouped into a single undo snapshot. The first action in the group names the entry in history. For example, creating several connections in quick succession will be grouped into one undo step and the label in the Undo Stack History will show the first connection created.
- History size: Up to 50 undo snapshots are stored locally.
Using Undo and Redo
- Toolbars: Undo/Redo buttons are available in the Draw Toolbar and the Report Toolbar.
- Keyboard: Undo with
Ctrl + Z; Redo withCtrl + Y. - Menus: Undo and Redo entries are available in the Edit Menu when working in a project.
Like typical undo systems, making a new change after undoing will clear your redo history, creating a new branch from that point forward.
Undo Stack History (Pro feature)
While basic undo and redo are available to all users, the Undo Stack History provides Pro users with a visual timeline of all project changes, allowing you to see exactly what happened and when. This view makes it easy to navigate through your project’s evolution and jump to any point in time.
Opening the History
- File Menu: Navigate to File → Undo Stack History.
- Keyboard Shortcut: Press
Ctrl+Alt+Z. - Draw Toolbar: Click the Undo Stack History button in the toolbar.
- Report Toolbar: Click the Undo Stack History button in the toolbar.
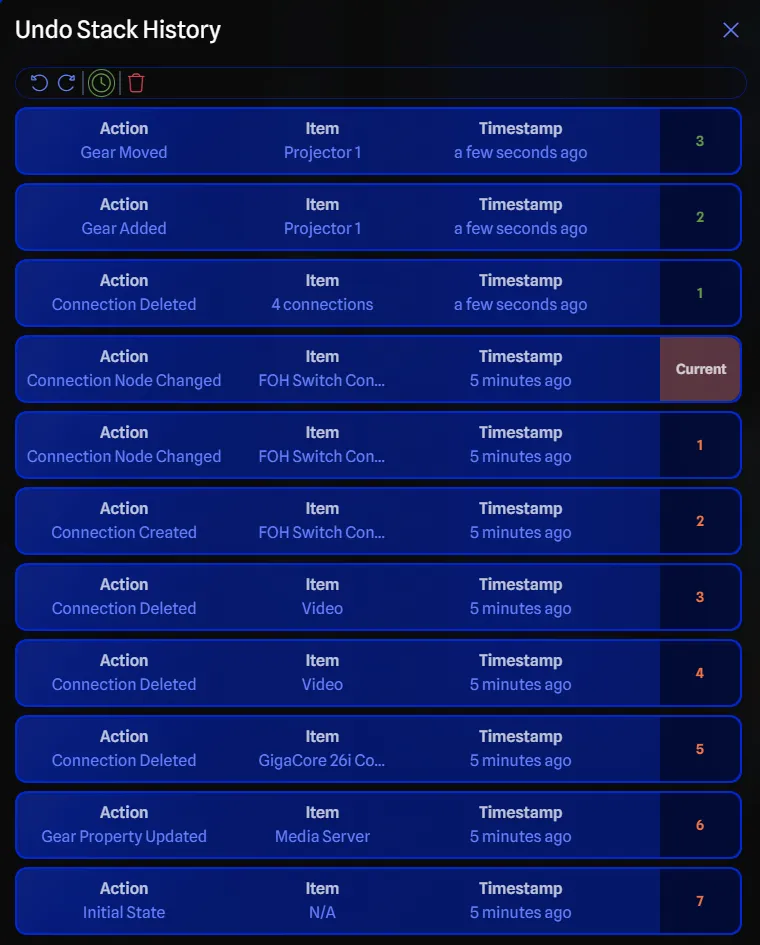
History Cards

Each history card displays four key pieces of information:
- Action: The type of change that was made (e.g., “Gear Added”, “Layer Created”, “Port Updated”).
- Item: The specific item that was affected (e.g., gear name, layer name, port identifier).
- Timestamp: When the change occurred, with options to toggle between relative time (“2 minutes ago”) and absolute time (exact date/time).
- Step Position: Shows the step number in your undo stack - either “Current” for your present state, or the number of steps before or after the current position.
Undo Step Positions appear in orange while redo steps appear in green, making it easy to distinguish between past and future states in your timeline.
Toolbar Options
![]()
The Undo Stack History includes a toolbar with several management options:
- Undo/Redo Buttons: Quick access to undo and redo functionality directly from the history view.
- Toggle Time Display: Switch between relative time (“2 minutes ago”) and absolute timestamp display.
- Clear Undo History: Removes all local undo and redo snapshots (use with caution as this cannot be undone).
Jumping Between States
To navigate to any point in your project history:
- Browse the Timeline: Scroll through the history cards to find your desired state.
- Click to Jump: Click on any history card to instantly jump to that point in time.
Alternatively, you may use the undo and redo buttons to step through your history one action at a time.
Tracked Actions
While the entire project state is captured in each snapshot, the below actions trigger Undo Stack entries and are labeled in the history timeline.
These are the actions that appear in the undo stack timeline.
Gear
- Gear Added
- Gear Property Updated
- Gear Locked
- Gear Unlocked
- Gear Moved
- Gear Resized
- Gear Layer Changed
- Gear Duplicated
- Gear Deleted
- Unused Gear Deleted
Drawing Items
- Item Cloned
- Background Opacity Changed
Connections
- Connection Created
- Connection Updated
- Connection Label Updated
- Connection Label Removed
- Connection Label Moved
- Connection Node Changed
- Connection Deleted
Drawing Settings
- Grid Size Changed
- Grid Toggled
- Grid Style Changed
- Snaplines Toggled
- Smart Routing Toggled
- Signal Flow Animation Toggled
- Drawing Origin Reset
Reports
- Report Created
- Report Renamed
- Report Locked
- Report Unlocked
- Report Cell Updated
- Report Structure Updated
- Report Saved
- Report Changes Discarded
- Report Deleted
Layers
- Layer Created
- Layer Updated
- Layers Pasted
- Layer Deleted
VLANs
- VLAN Created
- VLAN Updated
- VLANs Pasted
- VLAN Deleted
Port Manager
- Connector Colour Changed
- Connector Colours Pasted
- Connector Colours Reset
Cable Inventory
- Cable Inventory Created
- Cable Inventory Updated
- Cable Inventories Pasted
- Cable Inventory Deleted
Project
- Project Name Updated
- Project Version Updated
Gear Groups
- Gear Group Added
- Gear Group Resized
- Gear Group Auto Size Reset
- Gear Group Moved
- Gear Group Label Updated
- Gear Group Colour Changed
- Gear Group Locked
- Gear Group Unlocked
- Gear Group Deleted
Text Boxes
- Text Box Added
- Text Box Resized
- Text Box Moved
- Text Box Opacity Changed
- Text Box Colour Changed
- Text Box Locked
- Text Box Unlocked
- Text Box Deleted
Text Box Formatting
- Text Box Heading Applied
- Text Box Subheading Applied
- Text Box Normal Text Applied
- Text Box Bold Toggled
- Text Box Italic Toggled
- Text Box Underline Toggled
- Text Box Alignment Changed
Ports
- Port Option Updated
- Port Order Changed
- Port Group Order Changed
- Port Group Order Reset
- Port Group Side Override Changed
- Port Visibility Toggled
Bulk
- Bulk Move
- Bulk Lock
- Bulk Unlock
- Bulk Duplicate
- Bulk Align
- Bulk Distribute
- Bulk Labels
- Bulk Colours
- Bulk Layers
- Bulk Remove
- Bulk Connections
- Bulk Remove Nodes
- Bulk Layer Properties
- Bulk VLAN
- Bulk Connector Colour
- Bulk Cable Inventory
- Bulk Auto Size Reset
- Bulk Opacity
- Bulk Port Updated
- Bulk Port Labels
- Bulk Port IP Addresses
- Bulk Port Subnets
- Bulk Port VLANs
- Bulk Port Visibility